
I like making my own paper bags. I'm weird that way. But every now and then, I forgot how to make them. So I ended up fumbling with my papers and glue for more than the reasonable time to make a paper bag. Not to mention I messed up the paper pretty bad before I managed to remember how to do it properly.
Anyhow, I know that there are dozens of tutorial out there on how to make a paper bag. But as far as my keywords on Google went, none of them helped me remember because none of them are like how I make my paper bag.
I learned how to do it this way from a Japanese book on craft for children when I was little. Lost the book, hence the constant memory loss.
So, actually I am making this tutorial so I can go back to it when I forget again. But, hey, you can make one too. It's easy. It's from a craft for children book. It should be easy, right? Right?!
Materials
Paper
Scissors or cutter
Glue
Ruler
How to do it
Prep the paper. There's no real formula here. But here are some hints.
I'm making my paper bag base around 5x10 cm. So the paper width should be around 30 cm (four sides = 5+10+5+10). You can add one or two centimeters for glue allowances. How tall it should be? Since my base's width is 5 cm, so it's 'how tall you want it to be' plus 5 cm.
Here's mine.

I'm using scrap gift paper. So please excuse the wrinkles. Also, please note the barcode on the paper. That'll help you to understand what went where later on.
Step 1. Glue together the widths to make a cylinder or a tube.

Step 2. Flatten the tube along the glued end. This will be the Original Folds. See the glued end at the bottom? The barcode is now there with it. I'm going to flip it so you can see the barcode


Step 3. Open the flattened tube and make another fold near the Original Fold. Flatten along the new fold. If you're confused, note the barcode's position and the glued end. We shall call this new fold as the Bottom Fold.


Step 4. Now, fold in the Original Fold to make another fold out, parallel to the Bottom Fold. If I don't make sense, just follow the pictures and notice the barcode.


Step 5. Repeat on the other side. Hint: turn the Original Fold in and flatten.


Then I flip it again :D
Step 6. Here's where it gets exciting. The base! Fold it like this. How far you should go? Just half of the desired width, please. Then, fold it twice. Make sure that you fold it tight enough so they'll leave marks when you open them.


Step 7. Open the bottom like this.

Step 8. Hold one of the sides. I'm using my thumb to push the side out, forming a triangle at the base. Push the triangle down to make sure that it is flat.

Step 9. Fold the side in. Press flat. Repeat on the other side.


Step 10. You should have this shape by now. If not, don't worry. This is usually where I realize that I forgot the right steps. Just unfold everything and repeat from step 7.
If you do have this shape, it's gluing time! Smear glue in appropriate amount on the marked X areas. Then press.
 |
| Notice that I don't smear the glue on the white area because it will end up as the inside of the bag. |
Step 11. Smear some more glue on the other X marked areas. Press.

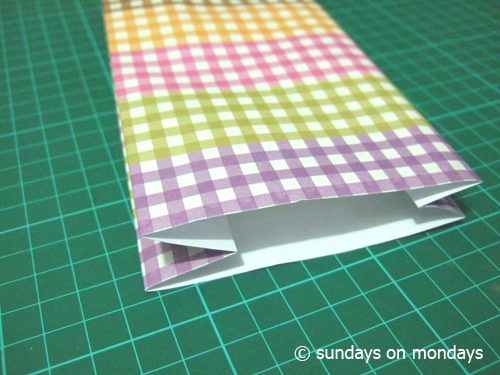
And you have the base done! Phew!

Step 12. Open the bag. Spread the base well. Fill it with anything you like.
I recommend using papers no thinner than 80 grams so it will be sturdy enough to stand on it's own. I don't usually add cardboard on the base, but It will help if you're going to fill it with something rather heavy.
Yeah, easy, right?
No comments:
Post a Comment